Quick Start Video
We recommend watching this video first! It’s just a few minutes, and will get you up and running right away.
When you hunger for more knowledge, you can dig into the Documentation further below 🙂 Or just post your questions online, that’s great for everyone to learn from!
Documentation
General Guidelines
Hey left-handed users! 🙂 You can swap the controls to “Lefty Mode”, from the main menu (home), or while editing a scene, via the on-hand menu. The images and videos here will right-handed mode, but the text should state both left and right. Also, once you swap the controls, all the on-hand tooltips will also swap, so you can always see which buttons do what 🙂
These general rules are a great place to start:
Interacting with Objects
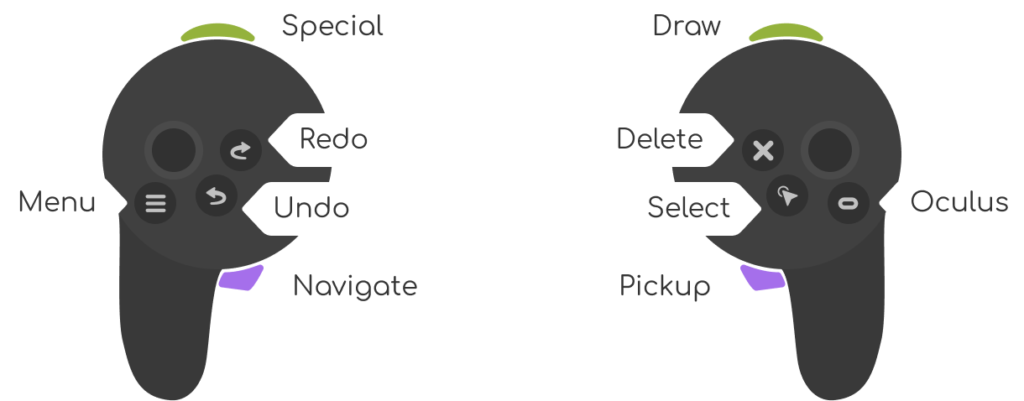
- Main Gripper will usually grab things, so you can move and duplicate them
- Main Trigger will usually create or draw
- “A” will usually select (X for lefty)
- “B” will usually delete (Y for lefty)
Navigating the Scene
- Pull and hold the secondary Gripper, then also the main Gripper
- Now you are “holding” the scene
- Push your hands forward and backward to move the scene around you
- Stretch your hands apart, or closer together, to stretch or shrink the scene
- Rotate your hands to to rotate the scene and view from a new angle
Interacting with Menus
- Point the main controller at the menu
- A laser line will appear, and clickable items will highlight blue
- Use the main Trigger to “click” the item
Tooltips!
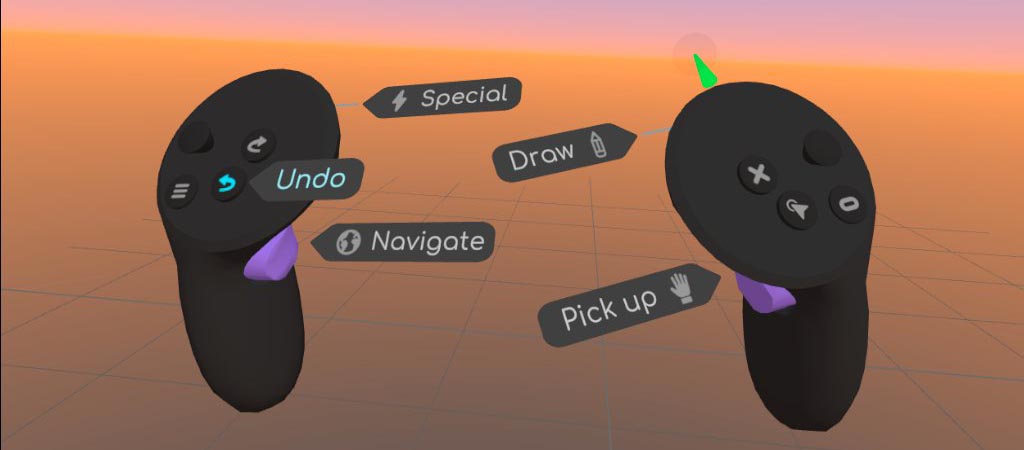
- Most importantly, the on-hand tooltips are always there to help!
- The Trigger and Gripper buttons always show tooltips
- Touch (but don’t press) the A, B, X, Y buttons to see their tooltips
- Using these, you can always check exactly what actions and tools are available 🙂
Create, Save, and Load Scenes
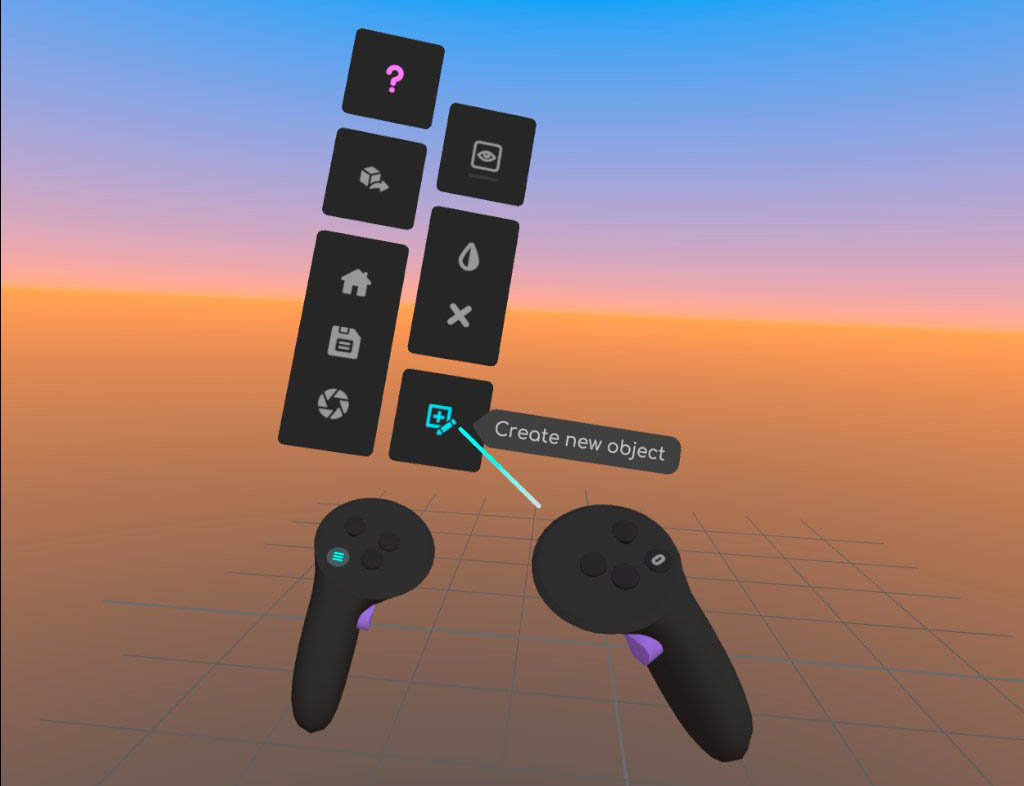
Create a new Scene

- To create a new Scene, click a + icon in the grid
- Now begin creating!
Saving your Scene
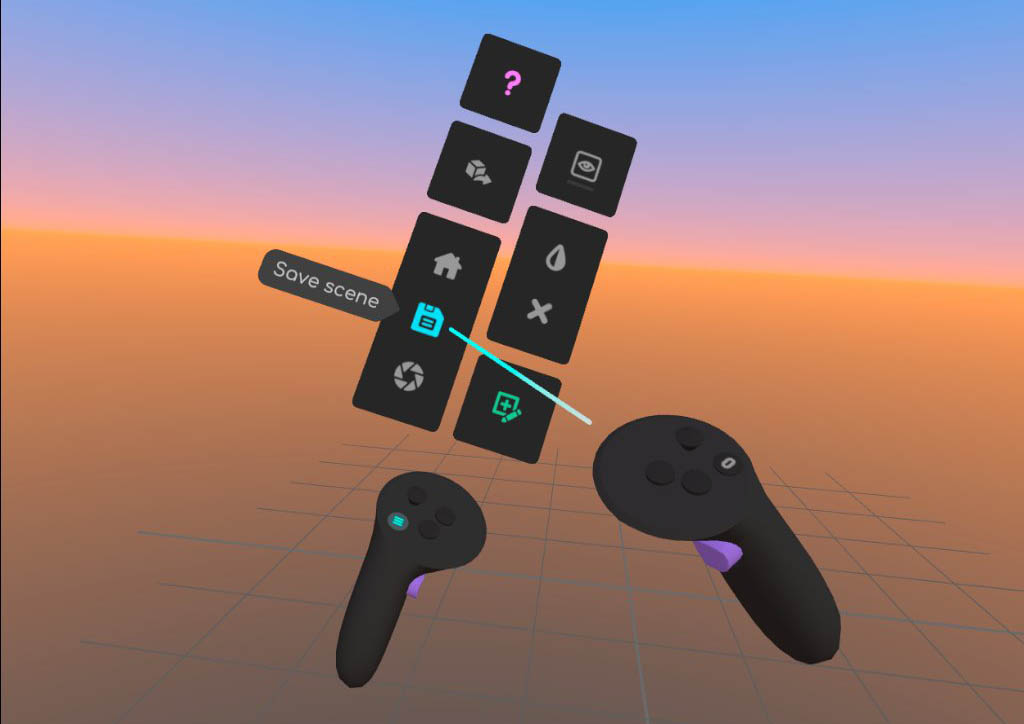
To save your Scene, press the Menu button on the left controller, then click the “Save” button
Left-Handed users: Yes, you still use the left-side button, but the menu will open on the right side. The “Menu” and “Oculus” buttons are set by Oculus and we can’t change them, sorry! Hopefully we can change this one day!
Setting the Scene Icon
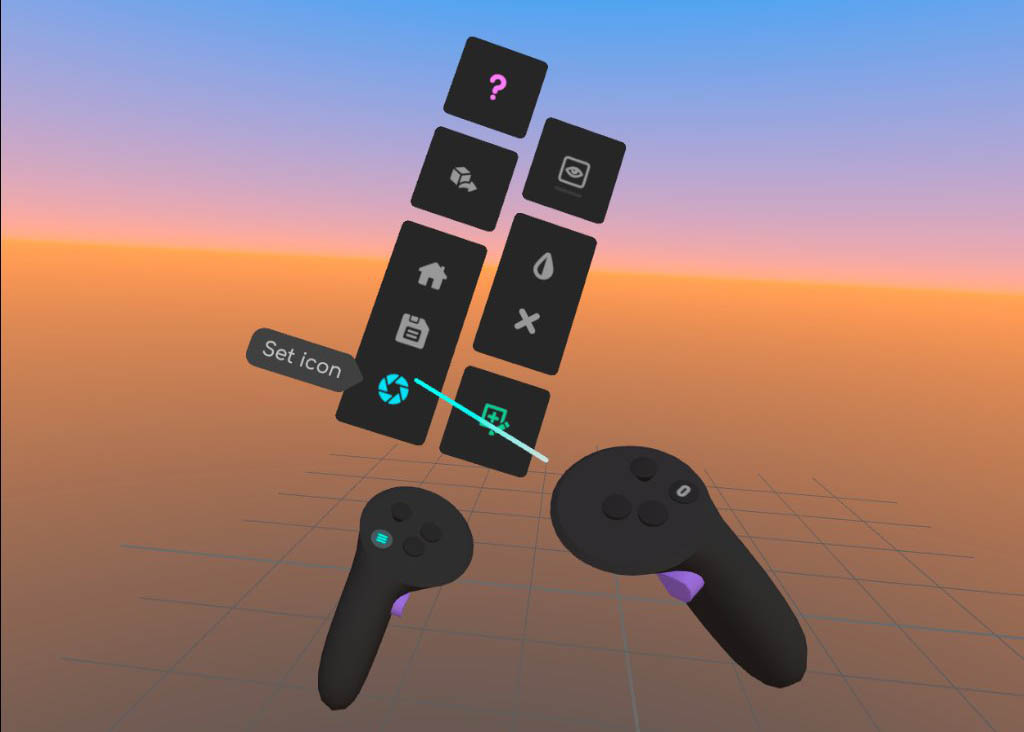
- To set the Scene icon, select any object, then open the Hand Menu and choose “Set Icon”
- Now, if you return to the Main Menu, you’ll see this object representing the Scene
Returning to the Main Menu
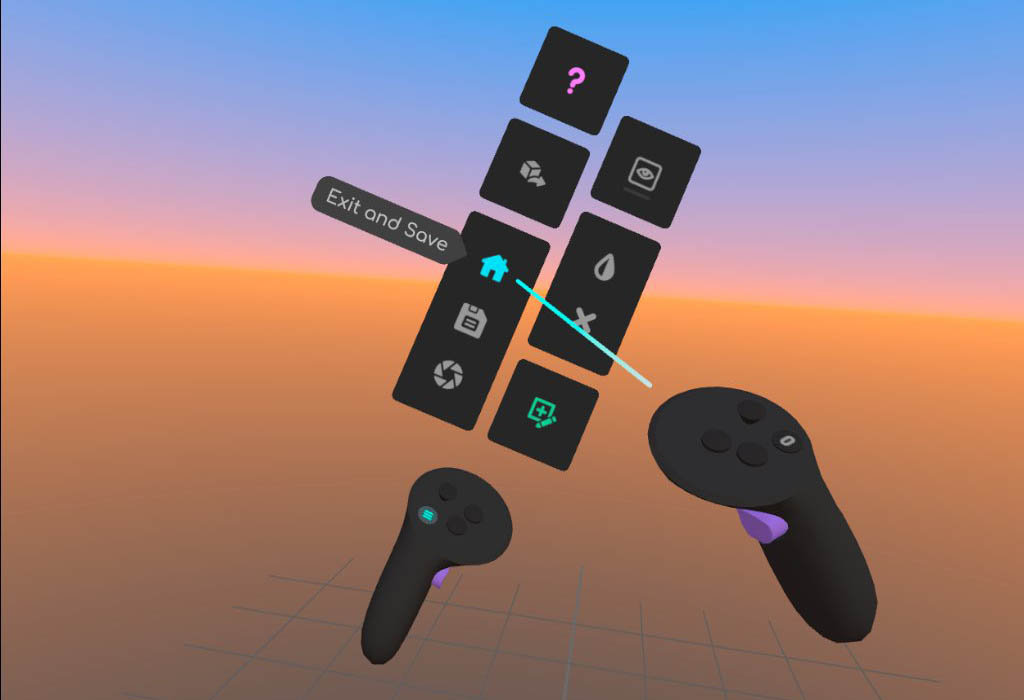
To save and exit, open the Hand Menu and click “Home”
Loading a Scene
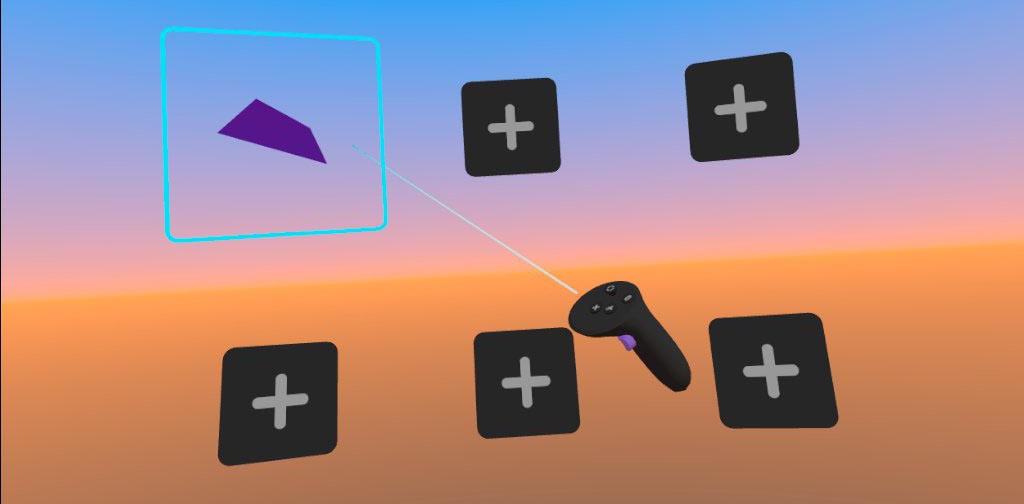
Hover on any existing scene in the Grid, and click to load it
Deleting a Scene
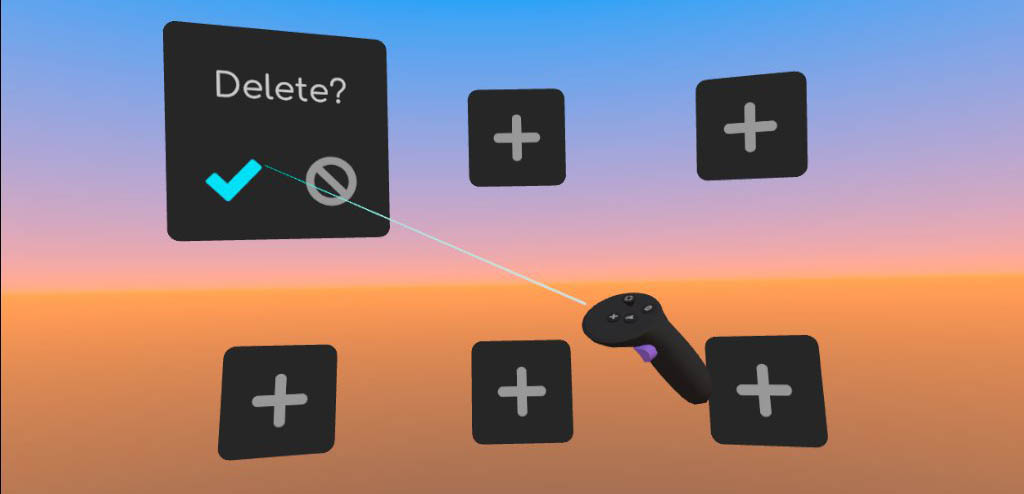
- Hover on an existing scene in the Grid, and press B
- A pop-up will appear in the Scene box
- Click the checkmark to delete the scene, or the cancel icon to cancel
Autosaves
Polysketch autosaves a backup when you open a file, and every few minutes while working. To access these backups, first you must understand a little of our save file structure. We save all scenes into a file called scene.txt inside a unique folder for each scene. By default that folder will be named for the day the scene was created, but you can rename that folder to better organize your files anytime. To access and restore files:
- Connect your headset via USB to your PC
- In your headset, click “Allow” to the data permission pop-up
- From your PC, navigate to the polysketch data location:
This PC\Quest 2\Internal shared storage\android\data\com.PolysketchLLC.polysketch\files
We will refer to this as \home\ in further path instructions - If you do not know the name of your scene, navigate one more directory into \home\SaveFiles\ and determine the scene you are after. Likely it will hold the last-edited file. Again, “scene name” is the name of the folder within SaveFiles that holds the appropriate scene.txt
- Navigate to
\home\AutoSaveor\home\PreOpenBackup\for the files created during autosave or before beginning editing respectively. These folders will contain a number of files named for the timestamp at which they were created. - From within Autosave or PreOpenBackup, navigate to the folder matching your scene name (determined in step 4)
- Select the backup you wish to restore, likely the most recent timestamp file
- Copy it into
\home\SaveFiles\YourSceneName\ - Navigate to
\home\SaveFiles\YourSceneName\ - Either delete
scene.txt, or keep to it around for safety, rename it to any other name - Rename your restored
<Timestamp>.txttoscene.txt - Relaunch Polysketch on your headset.
Special note: Yes, you can rename your scenes! Also, you can copy-paste as a new folder, to duplicate scenes, etc. Polysketch will simply load up whatever it sees here. You could even share files with friends this way … and yes, we intend to make all this much easier, soon!
Poly Drawing
Create a new Poly Object to Edit
Create a new object by pressing the Menu button on the left hand, then clicking “Create”
Drawing Simple Lines
- Pull and hold main Trigger, to begin drawing a line from the marker tip
- Move your hand, then release the trigger to complete your line
Moving Parts Around
- Hover on a point, line, surface, or Selection
- Pull and hold the main Gripper to grab the hovered item
- Now, just move the items with your hand, as if holding them
Connecting Lines
- Hover the marker tip on a point – you should see the point light up, and the controller will vibrate
- Now pull the main Trigger to draw a line as usual – it will start connected to that hovered point
- Release the trigger while hovering on another point, and it will connected as well
Adding Points While Drawing
- Start drawing a line as usual, but don’t release the trigger
- Instead, keep the trigger held and press “A” to place a point without ending the line
- Place as many points as you like, then release the trigger to place the final point
Special note – don’t go crazy with those points! Try to keep your shapes simple and minimal, especially at first.
If you’ve placed all the necessary points, press “B” to discard the last point and end your drawing
Drawing Surfaces
- Pull and hold the main Trigger to start a line as usual
- Use the “A” button to place points
- End the line (by releasing the Trigger) back on the first point
- Polysketch will automatically fill in the surface
Filling in Surfaces
- First, ensure you have a complete, looping outline to fill in
- Pull and hold the secondary Trigger to activate the “Special” tools
- Notice that the “A” button has changed to “Outline”
- Hover on any point in the loop, then hold “A” to being Outlining it
- Trace the outline with your hand, highlighting each point
- When you come back to the first point, completing the Outline, it will fill in
Cutting into Surfaces
- Hover on the surface, or a connected edge/point
- Press and hold the Trigger to draw as usual
- Keeping the marker tip inside the surface, place more points as desired
- Release the Trigger when done
When doing this, you will see the surface turn semi-transparent – this is to help you see your new lines as you sketch on the surface!
Selecting
Selecting multiple points allows you resize, extrude, duplicate, and other useful actions
- Hover on an unselected point, then press “A” to Select it
- You can also press and hold “A”, then wave your hand across more points, to select them all
- Selected points will show a bright white sphere
- To deselect a point, hover on it and press “A”
- Or, hover on it, then press and hold “A”, then wave your hand across more points to deselect them all
- To deselect all points, hover on nothing, then press “A”
Extruding
- Pull and hold the secondary Trigger to activate the “Special” tools
- Notice that the main Trigger has changed to “Extrude”
- Hover on a line, surface, or selection
- Pull and hold the trigger, then move your hand to Extrude
- Similar to drawing regular lines, press “A” to place intermediate sections, then release the Trigger to place the final section
If you go too far … simply press “B” to cancel the last-extruded section, and complete the action 🙂
Duplicating
- Pull and hold the secondary Trigger to activate the “Special” tools
- Notice that the main Gripper has changed to “Duplicate”
- Hover on a line, surface, or selection
- Pull and hold the gripper, then move your hand – you are now holding a duplicate
- As always when holding items, press “A” to place a copy, and release the Gripper to place the held item
If you placed all the duplicates you need, press “B” to delete the held object
Resizing
- Hover on a point, line, surface, or Selection
- Pull and hold the main Gripper to grab the hovered item
- Note that the secondary Gripper now shows “Resize”
- Pull and hold secondary Gripper, so that both grippers are now held
- Move your hands apart or closer together, stretching or squashing the item to resize it
Guide Snapping
While drawing your Poly, you can use Guide Snapping to line up parts
- Enable this by pressing the Menu button on the secondary hand, then toggling “Guide Snapping” ON
- Now, when you draw lines, guides will appear and snap your points to alignment with other points
- Special Note: if you need to limit the snapping, select the points you wish to snap to – now the snapping will only consider these.
Removing Points and Lines
- Hover on the point, line or selection you wish to remove
- Press the “B” button to remove these
Clearing Surfaces
- Hover on the surface you wish to clear
- Press the “B” button, and the surface will be cleared
Exiting the Object

When you are done editing an object, you can Exit it
- Press the Menu button on the left controller, then choose “Exit Object”
- Now, you will be able to interact with all objects in your scene
- Remember, you can always dive back into any object
- Just hover on it, and tap the main Joystick forward once
Special Note: Tap the main Joystick backward anytime to Exit, if you’d like a faster method than using the Menu!
Objects
Manipulate
- Hover on an object or selection
- Pull and hold the main Gripper to grab the item
- Now, just move the item with your hand, as if holding it
Select
- Hover on an unselected object, then press “A” to Select it
- You can also press and hold “A”, then wave your hand across more objects, to select them all
- Selected objects will be colored bright white
- To deselect an object, hover on it and press “A”
- Or, hover on it, then press and hold “A”, then wave your hand across more objects to deselect them all
- To deselect all objects, hover on nothing, then press “A”
Delete
Hover on an object or selection, then press “B” to delete it
Edit
- Hover on the object you wish to edit
- Tap the main joystick forward
- Now, you can edit the points, lines, and surfaces on this object
Note: You can also select the object, then open the on-hand menu and click the “Edit” button
Pickup and Copy
- Hover on an object or selection
- Pull the main Gripper to pick it up
- Now, press “A” to place a copy, repeat as needed
- Release the Gripper to place the final copy
Duplicate
- Pull the secondary Gripper to activate “Special” tools
- Note that the main Gripper now shows “Duplicate”
- Hover on an object or selection
- Pull the main Gripper to pick up a duplicate of that item
- Now, press “A” to place a copy, repeat as needed
- Release the Gripper to place the final copy
Setting Object Color
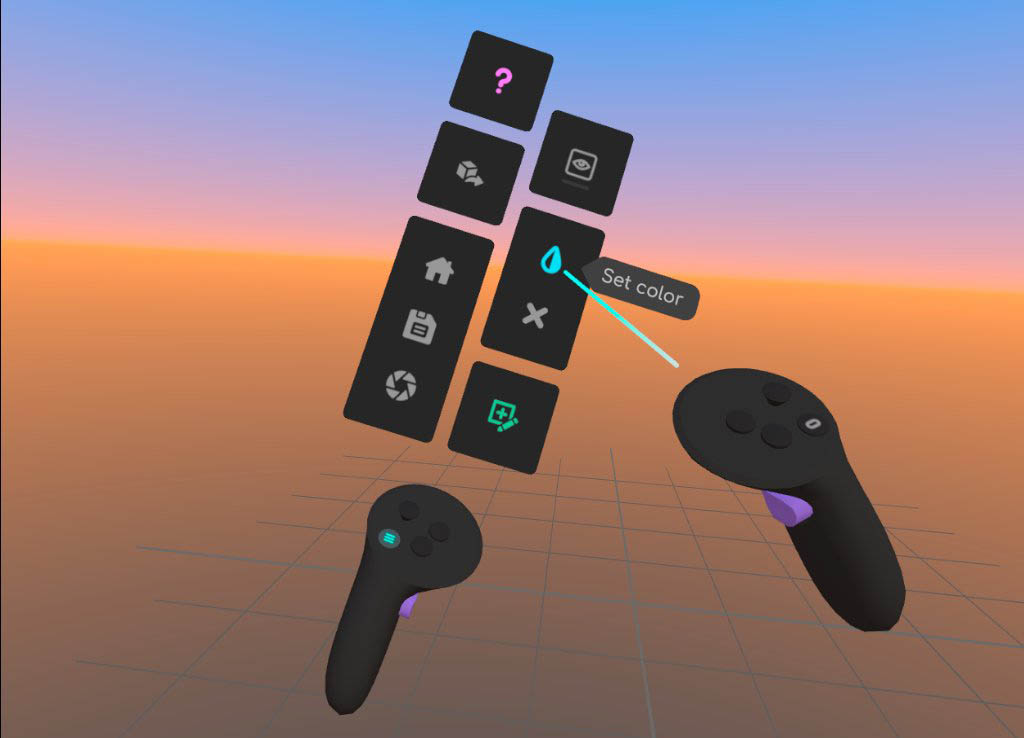
- Select the objects you wish to apply a color to
- Press the menu button on the left controller
- Click the “Set Color” button in the on-hand menu
- Use the color setting to pick a new color
Visual Settings
Wireframe
- Press the menu button on the left controller
- Disable “Show Solid”
Passthrough
- Press the menu button on the left controller
- Enable “Show Passthrough”
Using Reference Images
Place and view images in your Polysketch scene! This is a great way to build from reference, certainly much better than taking the headset on and off! We hope to add web browsing and downloading soon as well.
Learn to use this feature on the Reference Images page!
Importing 3D models for Retopology, or Reference
Yes, you can import a 3D model from Blender, etc into Polysketch! This is great for using Polysketch to retopo a higher poly mesh, or just for reference.
This is an experimental feature, so you can read all about it on the Danger Zone page!
Importing other 3D models, into Polysketch
Yes, you can import a 3D model from Blender, etc into Polysketch! This is great for using Polysketch to retopo a higher poly mesh, or just for reference.
Note: this feature is in a very early, very experimental stage. Please forgive the current clunky setup, we wanted to get this working ASAP for the many people who requested it- much work to come!
- Connect your headset to your computer via USB
- In the headset, you may need to answer “Allow” to enable the USB connection
- Open a file browser window on your computer, and navigate to the Polysketch OBJ folder:
This PC\Quest 2\Internal shared storage\Polysketch\ModelsToImport - Copy any
.objfile into that folder, optionally you can include referenced.mtlfiles - Polysketch will place the first object it finds within that folder into all scenes. The object is not moveable or editable (feature coming soon) within the scene
Exporting and Using in Other Applications
Exporting allows you to use your creations in just about any other application … Blender, Unity, Unreal, Roblox, 3D printing … just about anything!
Exporting the Entire Scene
This will create a single file, with the center of the grid as the center point.
- Ensure you have no objects selected
- Press the menu button on the left controller
- Choose “Export” in the on-hand menu
- This will export all objects in the current scene, as a single GLB file, into the folder:
Quest 2\Internal shared storage\Polysketch\Exports
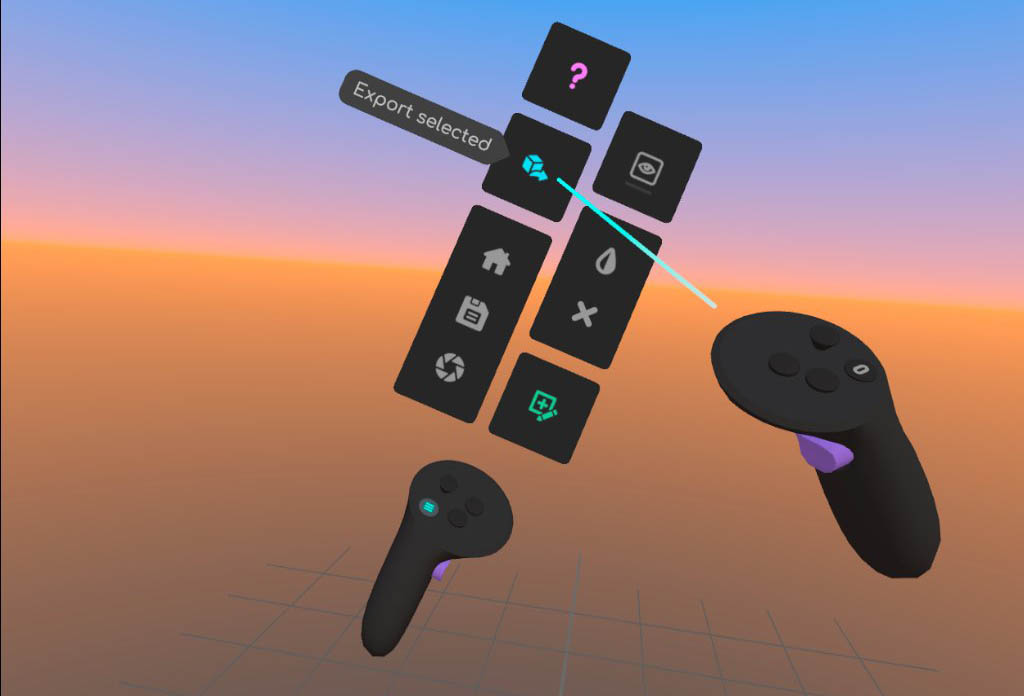
Exporting Specific Objects
If multiple objects are selected, this will create a single file, with the center of the grid as the center point.
If only one object is selected, this will create a single file, with object’s first-created vertex as the center point.
- Select the objects you wish to export
- Press the menu button on the left controller
- Choose “Export” in the on-hand menu
- This will export all selected objects, as a single GLB file, into the folder:
Quest 2\Internal shared storage\Polysketch\Exports
Using the Exported file in Other Applications
- Connect your headset to your computer via USB
- In the headset, you may need to answer “Allow” to enable the USB connection
- Open a file browser window on your computer, and navigate to the Polysketch exports folder:
This PC\Quest 2\Internal shared storage\Documents\Polysketch\Exports - Select the files you wish to use, and copy them to a location on your computer
- In the desktop application (eg, Blender, Unity, etc), import the GLB file
Special Note: For Unity, we recommend the gLTFast Plugin